How’s it goin’ team? Eric here again. It’s been a while since I’ve blogged, so I figured I’d write one based on some scenarios during a recent customer visit. It’s a long one, so hold on for the ride. I was on-site with a customer that added probably a hundred new zones since I’d been there last. The only reason we even looked at the number of new zones was because there appeared to be some DNS stale entries that were impacting SCCM deployments, and that’s when I found that aging/scavenging wasn’t enabled on the new zones (you can find very good info on scavenging here, here, and here). I also noticed that the zones were unsecured (issues with that can be found here).
I suggested that they do the following:
- Set it so DNS enables scavenging on all zones by default, so that it’s enabled when the zone is created.
- Set all of the zones that weren’t set to scavenge, to do so.
- Set it so DNS zones are automatically set to secure only. 😉
- Set all of the zones that weren’t set to be secure only, to do so.
Below is what I told them to do to accomplish those simple goals, however since some of the wizards don’t explain exactly what they do. Since you can get inconsistent or unexpected results, if you don’t know what to expect, I thought I’d clarify a bit.
In order to meet the first goal, to set all newly created zones to scavenge upon creation, I told them to run the following command on their servers, obviously changing <server> to their server names.
Dnscmd <server> /config /DefaultAgingState 1
Note: By default it’s set to 0. Also, unlike some other commands you can’t just type the command without a parameter to see the status. To get the status requires a separate command:
Dnscmd <server> /info DefaultAgingState
It’s important to note that the /DefaultAgingState switch is server specific, so if a zone is created on another DC/DNS server where it’s not set to 1, it won’t automatically be set to scavenge, unless that command is run for that server as well, or it’s enabled via the GUI – I’ll explain in greater detail below.
So what does that command do? Running ‘Dnscmd <server> /config /DefaultAgingState 1’ is the command line equivalent to right clicking the server, selecting “Set Aging/Scavenging for all Zones”, checking the “Scavenge Stale Resource Records” box, and then clicking OK.
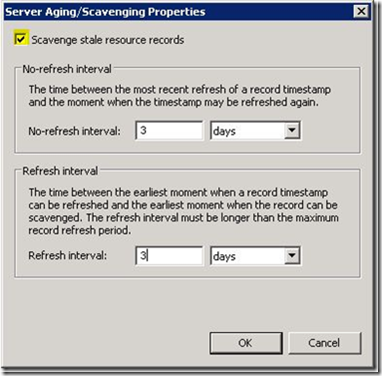
When you click OK, it’ll take you to the “Server Aging/Scavenging Confirmation” screen and then you’d click OK again, leaving the “Apply these settings to the existing Active Directory-integrated zones” check box unchecked. That sets it for that specific server ONLY.
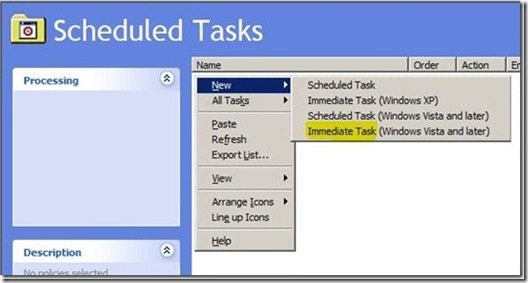
You can also define default no-refresh and refresh intervals (that will be modified on the same screen) by using the /DefaultNoRefreshInterval and /DefaultRefreshInterval switches. Those are also server specific settings, where you define the interval number of hours (Ex. DNSCMD <server> /config /DefaultRefreshInterval 72) where 72 hours = 3 days etc. If you have a small number of DNS servers then using the “GUI method” may be easier for changing all of the defaults. If you have several DNS servers, then you may want to use the command line using a batch file or script of some sort…or you could do it via Policy. The benefit of using a policy is that it’s not a single point in time change and it will configure future DC/DNS servers that come online that have the DefaultAgingState set to 0 (disabled), changing it to 1 (enabled). This will ensure that each DNS server sets zones to scavenge by default. This could be done a couple of different ways with a GPO. You could do it using the ‘Registry extension’ group policy preference (it works, but it requires the DNS Server service to be cycled), or you could use the ‘Scheduled Tasks extension’ choosing to do an immediate task. Defining an immediate task is the better method because it doesn’t require the cycling of the DNS Service. To set this up, create a GPO, navigate to Computer ConfigurationPreferencesControl Panel SettingsScheduled Tasks and then in the details pane, right click, select New, and then choose to configure an “Immediate Task (Windows Vista and Later)”, as seen below:
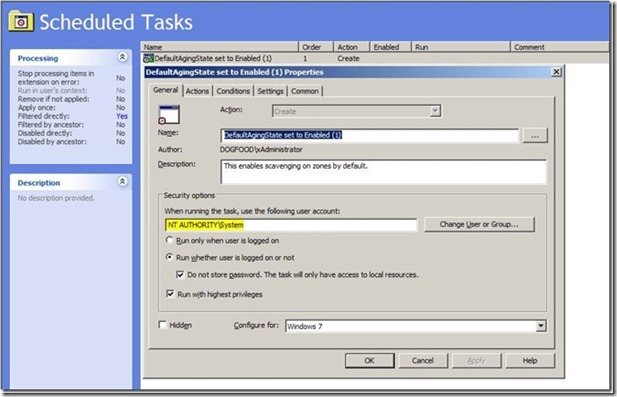
From there, define the settings on the General Tab per your preferences. My preference was to NOT use a domain account to run my task, there’s no need to. One note of caution is that though numerous MS articles state “If the preference item is part of Computer Configuration, by default the task is run in the security context of the SYSTEM account.”, this has not proven to be true in any of my testing. The only way that I’ve ever got it working has been to define ‘NT AuthoritySystem’ specifically, as seen below:
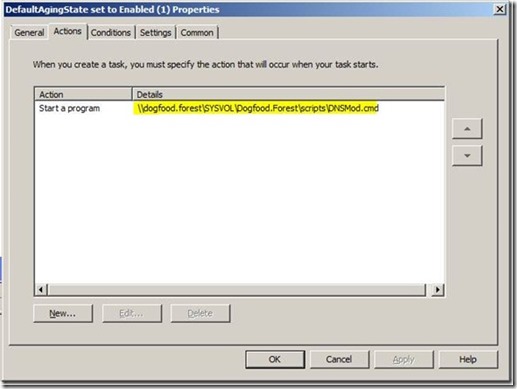
From there you would define the actions, choosing “Start a program” and then pointing to a UNC path for a .cmd, .bat file, or whatever other executable that you choose. As seen below, I’ve chosen to use a .cmd file; the .cmd file contains a single line –> ’dnscmd /config /defaultagingstate 1’ (minus the quotes), but could be modified to make numerous server specific modifications, such as the no-refresh/refresh intervals among many others.:
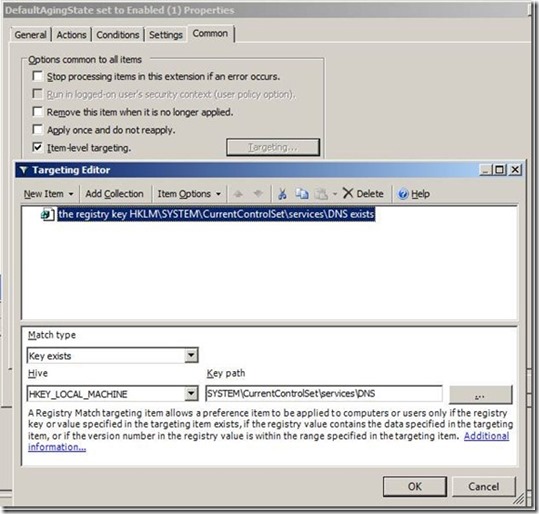
Furthermore, if you feel the need, you can use item level targeting to filter out any machines that don’t meet your criteria for application. In this case, I plan on applying this to the Domain Controllers OU, but maybe all DC’s don’t have the DNS role installed. Should that be the case, I decided to use a “Registry Match” item that filters out any servers that don’t have the HKLMSystemCurrentControlSetServicesDNS key, as seen below:
So why are we doing this again? Stick with me, I’ll dig in a bit more below to try to explain in greater detail.
With all of that said, the group policy above merely sets all existing and future servers’ new defaults to have a defaultagingstate set to 1; so when zones on those servers are created, they’ll be set to scavenge. It does not help define settings for existing zones however. You may still need to fix aging and potentially the no-refresh and refresh intervals for the current zones. That requires additional work using the “Set Aging/Scavenging for all Zones” wizard, defining the “Apply these settings to the existing Active Directory integrated zones”, or using the DNSCMD /config <zonename> /aging <value> or /norefresh <value> or /refresh <value> etc. Being that I think the wizard is more confusing, I’m going to discuss that over the command line options.
In using the wizard, one thing that I’m not a big fan of is that the “Server Aging/Scavenging Properties” wizard doesn’t explain very well what it is exactly that you’re enabling. When selecting “Set Aging/Scavenging for all Zones”, to me that sounds like a one time deal where you just run through the wizard, but that’s not necessarily the case.
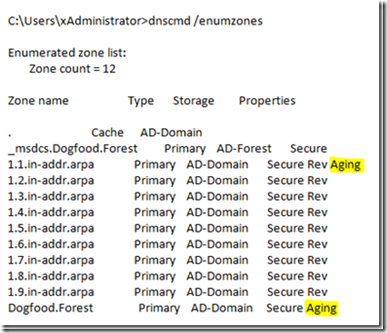
We’ll use the “Scavenge stale resource records” (Aging) check box as an example. So lets say that a bunch of new zones were created on another DNS server (lets call it DC02), but that server does not have the defaultagingstate set to 1. Later you do a DNSCMD /enumzones dump and realize that “Aging” is not set for most of the reverse lookup zones (the ones created on DC02) – (this is where having a default set go GPO would have helped):
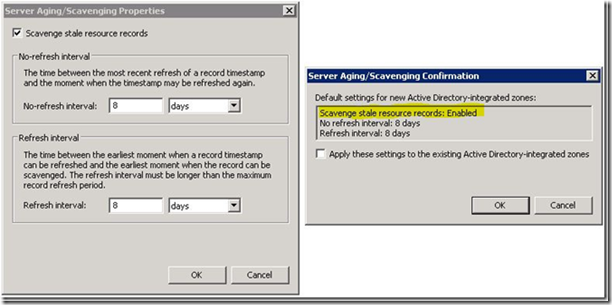
Well lets say that you go back to DC01 that does have defaultagingstate set to 1 and you try to use the “Set Aging/Scavenging for all Zones” wizard to set all of the zones above to age…you come to realize that it doesn’t work.. You see the blank confirmation window below saying that no changes will be made (though it doesn’t jump out and say that). It doesn’t change anything if you are trying to push what it already has as default. If the server default is to scavenge stale resource records, and also has a default of a 3 day refresh and 3 day no-refresh, then the changes will not be propagated to all zones as you might expect (again noted by the blank confirmation window):

Now, if on that same DC, where you already have default server level settings defined (DC01), if you change refresh/no-refresh intervals away from 3 in this example, to 5, then the confirmation window will reflect that change for the no-refresh and refresh intervals for all zones…(if you check the “apply these settings to the existing Active Directory-integrated zones”)…it will not however check the “Scavenge Stale Resource Records” check box for the newly created zone that was created from the other DC. That’s implicitly evident on the confirmation screen though, but you’d need to know what was missing in that screen to know that the “Scavenge Stale Resource Records” check box wouldn’t be checked.

If you want to make changes to the no-refresh and refresh intervals, as well as enabled “Scavenge Stale Resource Records” for all zones, as the Wizard implies, after already having these settings defined, you can do that by changing the no-refresh and refresh values, as well as unchecking the “Scavenge Stale Resource Records” box and click ok. In this case, you would not want to check “apply these settings to the existing Active Directory-integrated zones”. After you save the changes, you would go back into the wizard, define the settings that you do want applied to all zones, and then click OK.
Notice that this time, we see in the confirmation box, that it will also check the “Scavenge Stale Resource Records” box for the zone, where before that was implicitly left out. If we check “apply these settings to the existing Active Directory-integrated zones”, now this will apply to all zones as depicted on the confirmation screen, satisfying the second goal. Alternatively, you could make changes from another DNS server that has no defaults defined and that will also do it, among other ways.
To satisfy the third goal of setting the zones to be secured by default…you do absolutely nothing…its set that way by default.
They could have had it set to be unsecured for any number of reasons. In my mind, either they went out of their way to check the “allow both non-secure and secure dynamic updates” button for some requirement that they had (but as far as I know there is no requirement for that in their environment), or those were secondary zones that were created to “migrate” DNS from an old domain that’s now collapsed, where when they “promoted” those secondary zones to Primary/AD-integrated zones to preserve records, the zone security settings were also preserved. In this case the old zones were un-secure. Regardless of the reason, they wanted to set them all to be secure.
So to satisfy the last requirement of setting all of the zones to being secure without having to manually do it, we just ran the following command, again changing <server> to their server name:
dnscmd <Server> /config ..AllZones /AllowUpdate 2
When we ran the command however, it threw an error: DNS_ERROR_INVALID_ZONE_TYPE Regardless of the error, the command still worked. But now I had to know why it threw the error…
I only found one internal article that discussed the error when running the same exact command, but they said the cause was due to the customers’ server having secondary zones on it. In testing it in my lab, it also threw the same error. I don’t have any secondary zones however, nor does my customer, so that was out. The only thing that I noticed when testing in my lab was that when I did a dnscmd /enumzones after running the “dnscmd <Server> /config ..AllZones /AllowUpdate 2” command to set the zones to secure, the only zone that didn’t update was the built in TrustAnchors zone (for DNSSEC)…and being that it was my lab and I didn’t care, I deleted it. It immediately went away when killing it in ADSI, but it didn’t go away when re-enumerating the zones, it just said “Aging Down”. Eventually it went away when re-enumerating (though I may have cycled the DNS service) and after that the command ran without error.
Hopefully some of that helps someone in some capacity. If not, hopefully it was at least an interesting read.
Cheers,
Eric